 |
TELEMETRY |
 |
TELEMETRY |
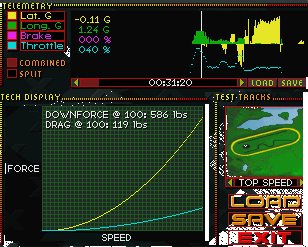
Telemetry data is very useful when setting up your car and studying your race performance in the VCR mode. The telemetry window can display 16 different points of information. By analyzing the data, it is possible to determine what forces were acting on the car, what the driver was doing at the time, and how the car responded. The telemetry data can be used to help improve car setup and driving skills by watching overall forces, braking points, and acceleration points.
TIP: The closer the overall force on the car is to the traction limit (as indicated in the G-G diagram) the higher the lap speeds will be.
Telemetry is recorded whenever you use a test track, practice or start a race. Your race data is stored in RAM while driving. On a minimum configured setup, there is enough memory to typically store about 4 minutes worth of data. Press the 0 (zero) key during the race to reset the telemetry buffer and restart recording (erasing the data previously in the buffer). You may also save the last 15 seconds of telemetry data by pausing the game (F5 key) and selecting QUICK 15. This can be done anytime during a race.
USE
On the Car Modify screen, you can select the interval displayed by adjusting the slider below the telemetry window. The Combined and Split boxes tell whether the data is all displayed on the same graph or if the graph is split, showing the first two and the second two selections separately. Telemetry data can be loaded and saved and can be viewed in the VCR.
WEIGHT TRANSFER DATA (G-G diagram)
This diagram, located above the telemetry window on the Car Modify screen or below it in the VCR, shows the force being applied to the car's center of gravity. The circle represents the traction limit of the tires or how much force the tires can withstand before breaking loose. The dancing line represents the current force amount and direction. When this line extends outside the traction circle, one or more tires are sliding. For optimal cornering, braking and acceleration, this line should be as close to the circle as possible without going too far over. The smaller circles, along with the digital value below it, represent the amount of weight or downforce applied to each tire. This lets you "see" the amount of weight transferred to each tire.
The following data is available for display, which can be selected in a drop down menu. Please note that as this site develops, more information on how to interpret telemetry data will be posted regularly.
EXAMPLE INTERPRETATIONS:
DATA: The rear wheels break loose while in a steady corner.
FIX: Tighten the rear by using less spring, less roll bar, or more rear wing. This will probably help fix the problem.
DATA: The front wheels lock under hard braking before the rear.
FIX: This usually means that there is too much front brake bias. Decrease the bias until the front and rear behave similarly.
DATA: As I leave a particular corner, the engine RPM is well below the maximum torque level.
FIX: The gear ratio for the selected gear should be adjusted to a higher value. This will cause the engine to be at a higher rev. for the same exit speed. This should give you better acceleration out of corner and better lap times. You must, however, be careful that you don't compromise other corners by making this adjustment.
DATA: On this track my car rarely or ever reaches sixth gear.
FIX: Sixth gear is considered a "gas mileage" gear so this isn't too much of a concern as long as gearing for the other corners is adequate. If you want to get sixth gear to engage more often, you can increase it's ratio (you may also have to increase fifth gear's ratio to avoid overlap).
DATA: The rear wheels broke loose while cornering and less weight was transferred over the rear wheels.
FIX: Loosening the rear by using less spring or less roll bar, will probably help fix the problem.